As in previous versions of the OS, in Windows 10 there is a hidden built-in Administrator account, hidden and inactive by default. However, in some situations it may be useful, for example, if it is impossible to perform any actions with a computer and create a new user, to reset the password and not only. Sometimes, on the contrary, you want to disable this account.
This guide details how to activate the hidden account Administrator Windows 10 in various situations. It will also discuss how to disable the built-in administrator account.
Enabling the Hidden Administrator Account Under Normal Conditions
Under the usual conditions further understood: you can go to Windows 10, and your current account also has administrator rights on the computer. Under these conditions, the activation of the built-in account presents no problems.
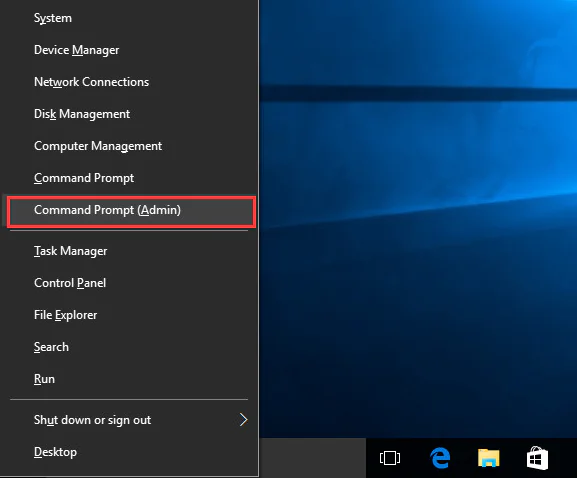
1. Run the command prompt on behalf of the Administrator (via the right-click menu on the “Start” button)
2. At the command prompt, type net user administrator / active: yes and press Enter.
3. Done, you can close the command line. Administrator account is activated.
To log into an activated account, you can either log out or simply switch to a newly activated user — both done by clicking Start – Current account icon on the right side of the menu. No login password is required.
How to Disable the Built-in Account Administrator Windows 10
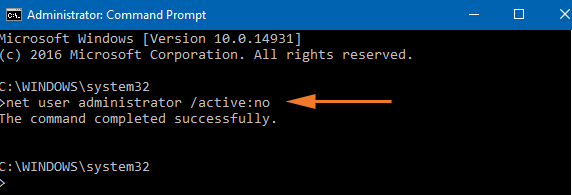
In general, to disable the built-in administrator account using the same method described in the first part of the manual, run the command line, then enter the same command, but with the / active: no key (i.e. net user Administrator / active: no).
However, a situation that has often occurred recently is when such an account is unique on a computer (perhaps this is a feature of some unlicensed versions of Windows 10), and the reason the user wants to disable it is partially inoperable functions and messages like “Microsoft Edge cannot be opened using the built-in administrator account. Sign in with another account and try again.
Note: before you perform the steps described below, if you have worked for a long time under the built-in administrator, and you have important data on the desktop and in the system folders of documents (images, video), transfer this data to separate folders on the disk (it will be easier than place them in the folders of the “normal” and not the built-in administrator).
In this situation, the correct way to solve the problem and disable the built-in administrator account of Windows 10 is the following:
1. Create a new account and grant the new user administrator rights
2. Log out of the current built-in Administrator account and go to the newly created user account, not the built one.
3. Once logged in, run a command prompt as administrator (use the right-click on the start menu) and type net user administrator / active: no and press Enter.
In this case, the built-in administrator account will be disabled, and you will be able to use a regular account, also with the necessary rights and without restriction of functions.
Enable the Built-in Administrator Account When Logging in to Windows 10 Is Not Possible
And the last possible option — the entrance to Windows 10 is impossible for one reason or another and you need to activate the Administrator account in order to take action to remedy the situation.
In this case, a possible solution to the problem will be as follows:
1. On the login screen, click on the “power” button shown at the bottom right, then, while holding Shift, click “Restart”
2. The Windows Recovery Environment will boot. Go to the Troubleshooting section – Advanced Options – Command Prompt.
3. You will need to enter your account password to run the command line. This time the input should work (if the password you remember is correct).
4. After that, use the first method from this article to enable the hidden account.
5. Close the command prompt and restart the computer (or click “Continue. Exit and use Windows 10”).
Consider Using Action1 to Enable Built-in Administrator if:
- You need to manage multiple endpoints simultaneously.
- You manage remote machines with computers not connected to your corporate network.
Action1 is a cloud-based remote monitoring and management solution encompassing tools such as automated patch management, software deployment, remote desktop, software/hardware inventory, endpoint management, and endpoint configuration.


