Windows App: Version Installation Settings
On the Installation tab of the app version settings, configure the following for your Windows app:
- Click on the target platform – this can be x86, x64, or ARM64.
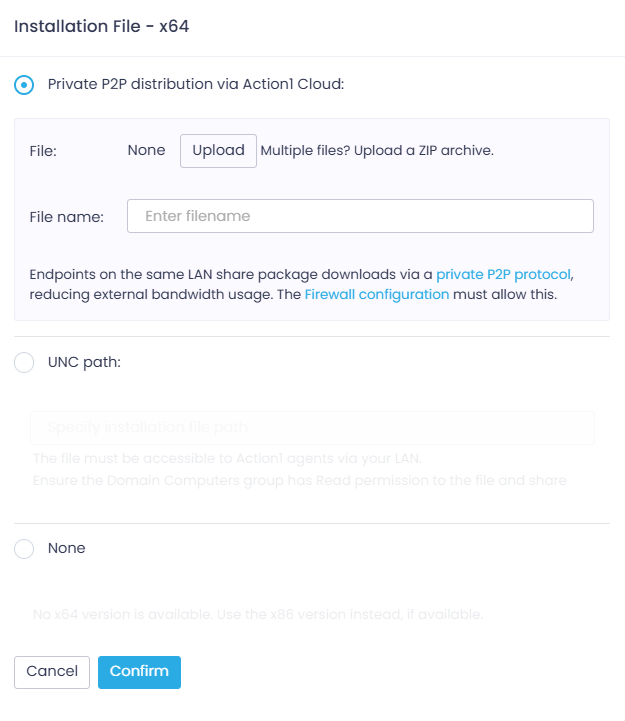
- In the Installation File dialog that opens, select the option you need:
- Upload files to a private Action1 Cloud for P2P distribution – this is a recommended option since it enables you to deploy installation to remote endpoints that aren’t connected to a corporate LAN. See Private P2P Software Distribution Technology for more information.
- Select a file from a public UNC location.
NOTE: You can upload a ZIP package with multiple files (EXE, MSI, or script) — see Prepare Multi-File Custom Packages for more information.
- Select None and define how Action1 should proceed if the corresponding binary is unavailable.
- For x64 packages: if such a package is unavailable, and you select None in this dialog, this will instruct Action1 to deploy the x86 version (if available) on the target x64-based endpoints.
- For x86 packages: if such a package is unavailable, and you select None in this dialog, the app will not be deployed on the target x86-based endpoints.
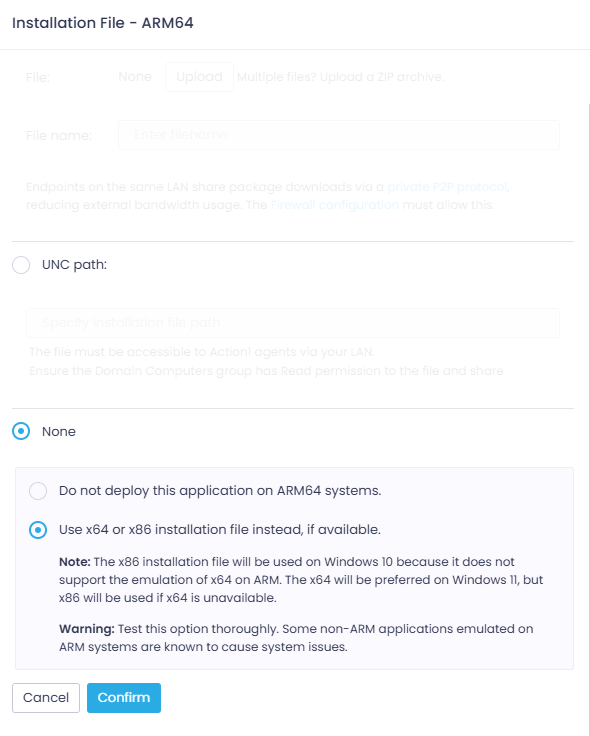
- For ARM64 packages: you have two options, as explained below.
- If you do not want the app package to be deployed on the ARM64-based endpoints, select the first option (default setting).
- Alternatively, you can instruct Action1 to use other setups instead of the ARM64 binary. For that, select Use x64 or x86 installation file instead, if available. Then Action1 will attempt to use x64 setup or x86 setup on your ARM64 endpoints.
NOTE: The x86 installation file will be used on Windows 10 because it does not support the emulation of x64 on ARM. The x64 file will be preferred on Windows 11, but x86 will be used if x64 is unavailable.
Important! Test this option thoroughly before use. Some non-ARM applications emulated on ARM systems are known to cause system issues.
- Click Confirm to save the settings and close the Installation File dialog.
If you need to configure multiple setups (for example, for 32-bit and for 64-bit architectures), repeat steps 1-3 for each of them.
- Wait for the upload process to complete, then click Save.
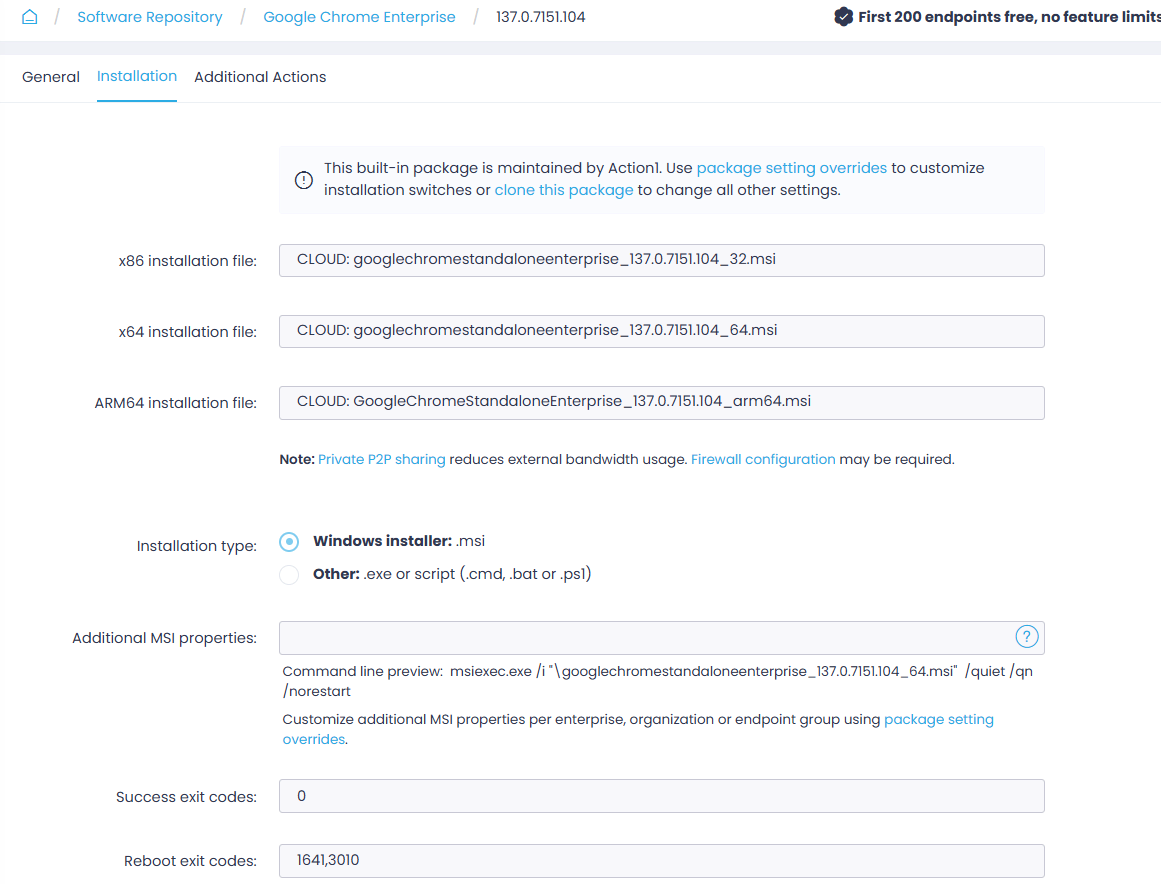
- On the Installation tab, make sure the corresponding Installation type is selected, depending on your deployment package:
- Windows installer: – for .msi
- Other: – for .exe, .cmd, .bat, .ps1, or .zip
- Customize your app installation by configuring the corresponding package properties.
Customizing Windows Installer (MSI) usage
In the Additional MSI properties field, you can specify parameters for silent installation:
- Enter the required silent install switches and setup parameters.
- Some MSI packages provide optional customization parameters called “public properties”. If you need to use a public property with a string value, enclose that value in quotes. To learn more about MSI properties, refer to Microsoft documentation.
- If you uploaded MSI within a ZIP, then you should first enter the full path (relative) to the MSI file:
.\[path_to_setup_inside_zip]\setup.msi param1=value1 - If the file name contains spaces, enclose it in quotes. Example for the MSI located in the root folder of the ZIP archive:
.\\"my setup.msi" param1=value1 - Finally, verify the resulting command using the Command line preview below the field.
Customizing EXE file usage
Provide Silent install switches to suppress any interactive prompts and allow the Action1 agent to run setup in a fully unattended mode, without any user input.
Example switches:
- /s
- /q
NOTE: The silent install/uninstall switches for EXE files are vendor- and app-specific. To discover silent install switches available for your application:
- Run the installer with /? or /help or a similar flag.
- Check the application’s official documentation.
If you uploaded the EXE file packed within a ZIP archive, then in the Silent install switch field you should explicitly specify the script that will run the EXE file. Enter the full path (relative) to the script file within the ZIP archive. If the file name contains spaces, enclose it in quotes.
Example:.\\testapp\\"application setup.ps1"
NOTE: If you are working with a “dumb” setup (the one that has no installer but requires running a script to copy app files to the destination folder), specify the script name as a Silent install switch parameter. If the script name contains spaces, enclose it in quotes. To learn more about “dumb” setups, refer to Prepare Multi-File Custom Packages.
- Specify Success exit codes for your installation. Action1 uses this code to determine whether the installation succeeded or failed. In most cases, the code 0 indicates a successful operation.
NOTE: You can verify the success exit code with the app publisher.
- Specify Reboot exit codes. Action1 uses them to define whether the restart operation is needed after installation. In most cases, you can use the default codes for your app, for example, 1641, 3010.
Next, configure Additional Actions for your app, as described in Add Custom Packages to Software Repository.


