“”You can limit the ability of users to perform certain actions by adding users or removing the user from being a member of groups. Each group has its own default rights and permissions. When a user is a member of a group, the user will be assigned the rights and permissions of the group to them. A right authorizes a user to perform certain actions on a computer, such as backing up files and folders or shutting down a computer. A permission is a rule that is associated with an object (usually a file, folder, or printer), and it regulates which users can have access to the object and in what manner. This tutorial will show you how to remove local group member on Windows 10.
Remove Groups from Users from Users Folder in Local Users and Groups
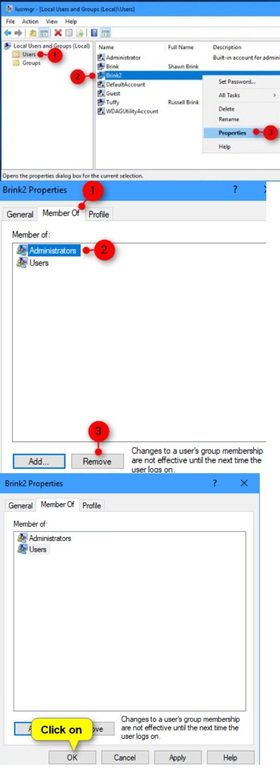
1. Press the Win+R keys to open Run, type lusrmgr.msc into Run, and click/tap on OK to open Local Users and Groups.
2. Click/tap on Users in the left pane of Local Users and Groups.
3. Right click or press and hold on the username (ex: “Brink2”) you want to remove groups from, and click/tap on Properties.
4. Click/tap on the Member Of tab, select the group (ex: “Administrators”) you want to remove, and click/tap on the Remove button.
5. Click/tap on OK.
6. When finished, you can close Local Users and Groups if you like.

To Remove Users from Groups from Groups folder in Local Users and Groups
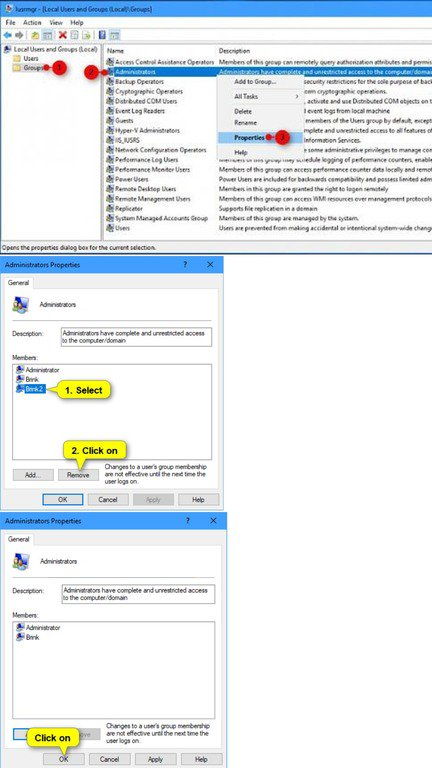
1. Press the Win+R keys to open Run, type lusrmgr.msc into Run, and click/tap on OK to open Local Users and Groups.
2. Click/tap on Groups in the left pane of Local Users and Groups.
3. Right click or press and hold on the group name (ex: “Administrators”) you want to remove users as members of, and click/tap on Properties.
4. Select a username (ex: “Brink2”) you want to remove as a member, and click/tap on the Remove button.
5. Click/tap on OK.
6. When finished, you can close Local Users and Groups if you like.
To Remove User from Group in Command Prompt
1. Open an elevated command prompt.
2. Type the command below into the elevated command prompt, and press Enter.
net localgroup “Group” “User” /delete
Note: Substitute Group in the command above with the actual name of the group (ex: “Administrators”) you want the user to no longer be a member of.
Substitute User in the command above with the actual name of the user account (ex: “Brink2”) you want to no longer be a member of the group.
For example: net localgroup “Administrators” “Brink2” /delete
3. When finished, you can close the elevated command prompt if you like.
To Remove User from Group in PowerShell
1. Open an elevated PowerShell.
2. Type the command below into the elevated PowerShell, and press Enter.
Remove-LocalGroupMember -Group “Group” -Member “User”
Note: Substitute Group in the command above with the actual name of the group (ex: “Administrators”) you want the user to no longer be a member of.
Substitute User in the command above with the actual name of the user account (ex: “Brink2”) you want to no longer be a member of the group.
For example: Remove-LocalGroupMember -Group “Administrators” -Member “Brink2”
3. When finished, you can close the elevated PowerShell if you like.
Consider Using Action1 to Remove Local Group Member if:
- You need to perform an action on multiple computers simultaneously.
- You have remote employees with computers not connected to your corporate network.
Action1 is a cloud-based remote IT management solution encompassing tools such as patch management, software deployment, remote desktop, IT asset inventory, endpoint management and endpoint configuration.


